The key to successful sod installation begins with soil preparation. New sod establishes quickly, taking root and flourishing into a thick, long-lasting turf. This guide will explain what you need to know before you lay sod, including how to clear the site, test and prepare your soil, and add Lawn fertilizing.
What is Sod?
Sod is a combination of grass and overtaken the soil underneath as a thick mat of roots. It is raised on farms and harvested in strips or squares that can be laid down on prepared earth to provide an instant lawn. Sod gives you a good green surface immediately, helps prevent soil erosion, and it establishes more quickly than seeding, so it’s a popular choice for homeowners looking for an instant lawn and service for professional landscapers.
Materials and Tools
In addition to the sod, there are a few tools and supplies you’ll need to help make the installation as smooth as possible:
- Stakes and markers to outline the area
- Aerator to loosen compacted soil
- Sod cutter for removing old grass if necessary
- Leveling rake for smoothing the soil
- Rototiller or plow to till the soil
- Lawn roller or tamper to press sod firmly into the soil
- A measuring tape or wheel to calculate the area
Different Soil Types and Their Effects on Sod
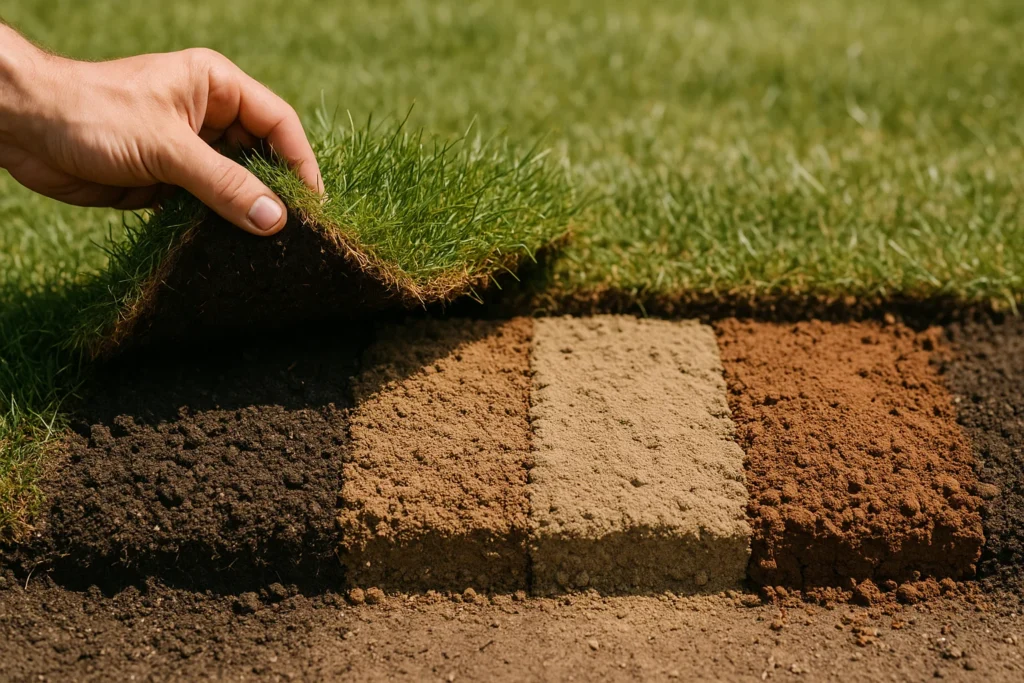
Sod installation could benefit greatly depending on the soil you already have in the yard. There are several factors to consider regarding the soil, including its nutrient content and soil type. Here’s a friendly breakdown of the prime types of soil you could come across and the impacts they have on sod growth:
Sandy Soil: Sandy soil is easily drained and can dry up too easily. Thus, it prevents the young sod in the ground from remaining wet and growing deep roots. Apply organic matter or compost to sandy soil to improve nutrients.
Clay Soil: Clay soil has the potential to retain a lot of water and may be heavy, so roots may not easily push through. When your yard is made of clay soil, it is even a necessity to till it thoroughly and use compost or other organic amendments to help the roots be able to flourish due to the better drainage and aeration capabilities.
Loamy Soil: The gold standard of sod is loam. This is a good mix of sand, silt, and clay, which is equal in amount and has equal drainage quality, moisture retention, and fertility. If you’re lucky enough to have loamy soil, your sod will establish quickly and thrive with minimal effort.
Silty Soil: Silty soils are good moisture retainers and are easily compacted. These should be aerated and enriched with organic matter, just like clay, so that your sod roots will breathe and grow.
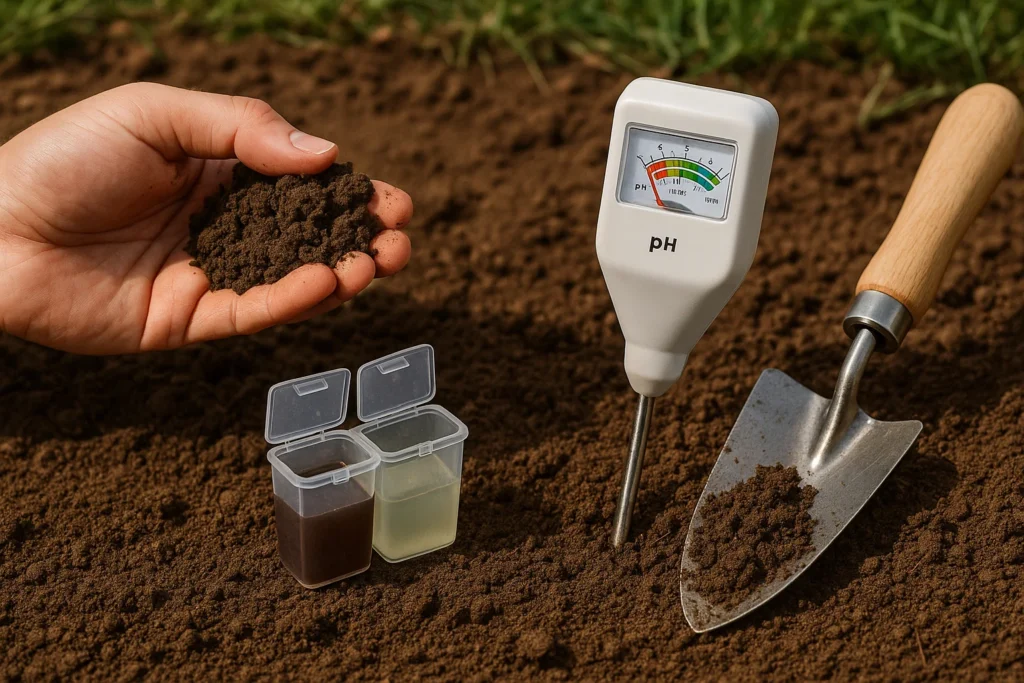
How to Test Your Soil pH and Nutrient Levels Before Sodding
Before laying sod, it is important to test your soil- this is the initial step to having a beautiful green lawn. This is how you can simply test the pH and nutrient level of your soil:
Grab a Soil Test Kit: You can find at-home kits at garden centers, and they are easy to use. All you have to do is follow the directions. Typically, you will dig up a small sample of a few locations in your yard, combine them, and test pH and important nutrients.
Professional Soil Analysis: To get more detailed results, you need to send a sample to your local cooperative extension office or a soil testing laboratory. These tests give a breakdown of the pH, nitrogen, phosphorus, and potassium in your soil and what amendments you should make. It may take 10 days to get results, so be prepared.
What Should You Look For?
pH: The majority of turfgrasses prefer slightly acidic soil with a pH range of 6.0 to 7.0. Your soil should be below or above this range; add lime to increase the pH or sulfur to decrease the pH.
Nutrient Levels: The main nutrients of sod are nitrogen (to have healthy green blades), phosphorus (to have strong roots), and potassium (to have a healthy plant). Your sod may need a boost to grow strong, deep roots, and a starter fertilizer, which is rich in phosphorus, can do the trick.
How to Prep For Sod
Installing sod is a simple task if done right, but it is all about the soil prep work & technique. Proper soil preparation establishes a base for sod that is fertile, well-drained, and can be laid on a level grade. Without the base, your sod might have trouble rooting and grow spotty, weedy or not at all. The work you do in preparing your soil will pay off in the form of a beautiful lawn for years to come.
Step 1: Clear the Site
Clean up to the point of being rid of all debris, such as rocks, sticks, old roots, and any construction materials. It is a good idea to dig up any existing grass, weeds or plants to start with a fresh base. This can be accomplished by application of herbicides, and/or by physical removal of the vegetation.
Step 2: Rough Grade the Area
The building pad is rough graded to remove excess material, water pooling and eliminate drainage concerns by sloping the building pad away from the building. Level high spots, fill lows and do any final shaping using hand-held tools or a tractor. This will expose more reflections, so clean as necessary.
Step 3: Till the Soil
- Loosen the soil 4 to 6 inches deep with a rototiller or garden fork.
- Tilling loosens compacted soil.
- It increases air circulation and promotes the ability of roots to pass through.
- It also incorporates organic matter and amendments for improved fertility.
Step 4: Mix in Topsoil and Amendments
If your soil is not rich in organic matter or nutrients, add in a generous amount of good-quality topsoil or compost. You will be aiming for a soil depth of 4-6 inches altogether. Do a soil test to test for pH and nutrients. “Add lime to increase or sulfur to lower the pH and add a starter fertilizer that is high in phosphorus to promote root growth.
Step 5: Finish grading the Site
Once your soil amendments are tilled gently, smooth the surface with a rake, being careful to make sure that it’s at the correct slope and that your soil is roughly ¾ of an inch below the height of sidewalks and driveways so that it can settle. Sift out any rocks and other debris.
Step 6: Add Fertilizer
Fertilize the soil with a starter fertilizer 10-10-10 or 13-13-13 and lime based on soil test recommendations. Before laying sod, till the fertilizer into the ground.
Step 7: Settle the Soil
Gently water the soil once it has been prepared to help it settle. You could firm it with a lawn roller, if necessary, but don’t compact it. If possible, allow the soil to sit for a few days before installing the sod.
Step 8: Ready For Sod
Once the soil is ready, the sod pieces are placed closely together in a staggered, brick-like pattern to minimize gaps. Press each strip into the soil well for good root contact.
Step 9: Water Properly
After the sod is installed, it needs to be watered deeply and frequently to promote rooting into the soil below. Good maintenance during the establishment period is crucial for a healthy lawn.
Soil Preparation Tips for Sod
Test Soil Early: Test your soil a month before the sod is put in to make any possible amendments.
Don’t Bring Up Weed Seeds: If you have problems with weeds, try applying a pre-plant herbicide and waiting for it to work before you till.
Inspect Proper Drainage: See that water drains away from your home, and do not plant on the sides of steep hills where it may cause erosion.
Water Before Laying Sod: Understanding the benefits of water before laying sod will help the sod to root quickly. Water the ground with plenty of water 24 to 48 hours before fitting.
Best Time to Lay Sod
The best time to lay sod varies based on the type of grass.
- The best time for cool-season grasses like Kentucky bluegrass or perennial ryegrass is the late summer to early fall period, when temperatures are mild and there’s more rainfall.
- Late spring through early summer is the best growing period for warm-season grasses such as Bermudagrass and St. Augustinegrass. Do not lay the sod on frozen or extremely hot ground.
- Select the species of sod that matches your climate, sun, and maintenance needs. Northern climates do best with cool-season grasses, and southern climates prefer warm-season grasses.
In the end, think about how sunny your yard is and how much maintenance you can handle, as sod can dry out fast.
Sod Pre-Installation Steps
Proper soil preparation establishes a base for sod that is fertile, well-drained and can be laid on a level grade. Without the base, your sod might have trouble rooting and grow spotty, weedy or not at all. The work you do in preparing your soil will pay off in the form of a beautiful lawn for years to come.
Conclusion:
Sodding Proper soil preparation is the key to a successful sod installation. Clear, grade, till, amend, and level the soil well so that your sod will have a nice flat layer on which to root and grow deep. By following this guide you guarantee you’ll have a beautiful green lawn on your property for years to come.
FAQ’s
You can sod the land (a depth of 4 to 6 inches) for loosen compacted soil and mix in amendments.
Yes, It’s a good idea to pull or kill existing grass and weeds before laying sod. It is best to reduce competition and ensure good root contact.
You can purchase a soil test kit, or you can send a sample into your local cooperative extension office for analysis.
The majority of turfgrasses grow best in slightly acid soil PH(6.0 and 7.0). .
Early spring, or early fall, which still has moderate temperature but rains more.